Taking Charge of Apps and Processes in macOS with Activity Monitor
If your Mac starts dragging its feet or an app decides to throw a tantrum, chances are a rogue app or process is behind it. Thankfully, macOS comes equipped with Activity Monitor—a trusty sidekick for keeping tabs on system resources and wrangling them back in line. In this guide, we’ll walk you through how to use Activity Monitor to get a handle on apps and processes, shining a light on familiar troublemakers like WindowServer, kernel_task, trustd, coreaudiod, launchd, spindump, and cloudd. Whether you’re playing detective or just tidying up performance, we’ve got your back.
So, What’s Activity Monitor All About?
Think of Activity Monitor as macOS’s version of a control room, not unlike Task Manager on a Windows machine. It’s your live feed into what’s happening with CPU, memory, energy, disk, and network activity, plus it hands you the reins to manage whatever’s running. For tech-savvy folks and pros, it’s a must-have for sniffing out problems and getting things running smoothly again.
To open Activity Monitor:
- Press Command + Space to bring up Spotlight Search.
- Type “Activity Monitor” and hit Enter.
- Switch between tabs (e.g., CPU, Memory) to analyze system activity.
Why Control Apps and Processes?
Unmanaged apps and processes can hog resources, cause crashes, or overheat your Mac. Activity Monitor empowers you to identify problem processes, terminate them if needed, and maintain system stability. Below, we’ll explore seven processes you might encounter and how to control them.
Managing Key macOS Processes
1. WindowServer: Managing Graphics
- What it does: Handles rendering windows and graphical elements on your screen.
- Why control it: Multiple displays or graphics-heavy apps can spike its usage.
- How to manage: In Activity Monitor, locate WindowServer under the CPU tab. Reduce screen clutter or disconnect external monitors to lighten its load.
- Control tip: Restart your Mac to reset it if it’s persistently high.
2. kernel_task: System Resource Protector
- What it does: Manages system resources and prevents overheating by throttling CPU usage.
- Why control it: High usage often signals thermal issues rather than a process to stop.
- How to manage: Check kernel_task in Activity Monitor—it can’t be quit directly. Clean vents or reduce system load to lower its activity.
- Control tip: Monitor CPU temperature with third-party tools to confirm.
3. trustd: Security Certificate Validator
- What it does: Verifies website and app certificates for security.
- Why control it: Network-heavy tasks or invalid certificates can overwork it.
- How to manage: Find trustd in Activity Monitor. Quit it (it’ll restart) or fix network issues to reduce its impact.
- Control tip: Clear Keychain Access errors if it’s stuck.
4. coreaudiod: Audio Processing Daemon
- What it does: Manages audio input/output for apps and system sounds.
- Why control it: Faulty audio devices or apps can cause spikes.
- How to manage: Spot coreaudiod in Activity Monitor. Quit it (it restarts) or disconnect external audio devices to test.
- Control tip: Restart Core Audio via Terminal: sudo killall coreaudiod.
5. launchd: The Process Launcher
- What it does: Starts and manages all processes and services in macOS.
- Why control it: Misconfigured startup items can overload it.
- How to manage: View launchd in Activity Monitor—it’s untouchable directly. Manage startup items in System Settings > General > Login Items.
- Control tip: Use launchctl in Terminal for advanced control.
6. spindump: Performance Diagnostic Tool
- What it does: Generates reports when apps hang or crash.
- Why control it: It activates during slowdowns, temporarily spiking CPU.
- How to manage: Check spindump in Activity Monitor—it usually stops on its own. Quit hung apps to prevent its activation.
- Control tip: Avoid force-quitting it unless necessary.
7. cloudd: Cloud Sync Service
- What it does: Syncs files and data with iCloud.
- Why control it: Large uploads/downloads can bog it down.
- How to manage: Locate cloudd in Activity Monitor. Pause iCloud syncing in System Settings > Apple ID > iCloud to ease its load.
- Control tip: Quit it temporarily if syncing isn’t urgent.
8. Google Chrome Helper: Browser Support Process
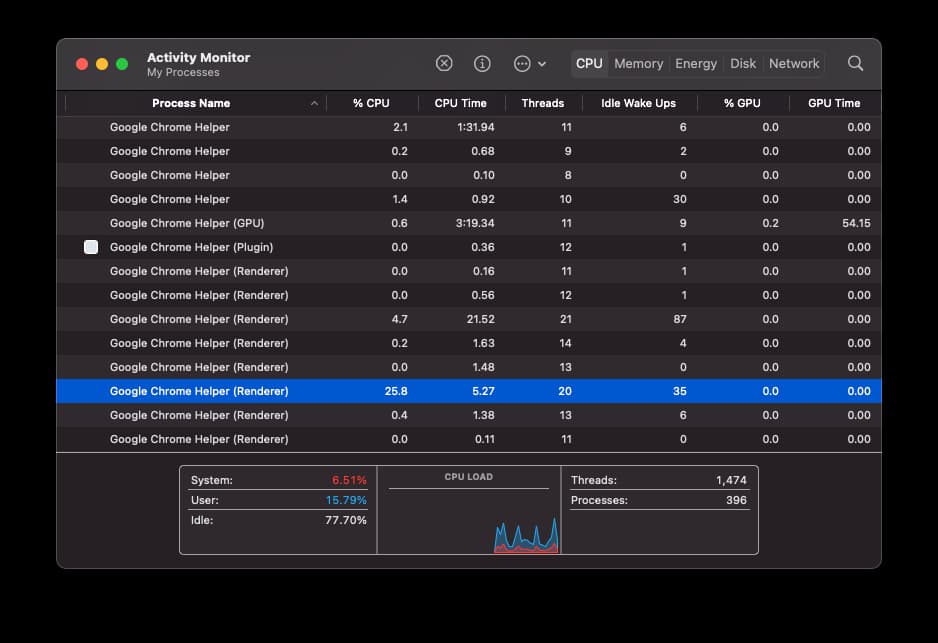
- What it does: Assists Google Chrome by handling plugins, extensions, and rendering web content.
- Why control it: Multiple tabs, heavy websites, or rogue extensions can cause it to consume excessive CPU or memory.
- How to manage: Locate Google Chrome Helper in Activity Monitor under the CPU or Memory tab. Quit it to stop a specific instance (Chrome may restart it), or close unnecessary tabs/extensions in Chrome.
- Control tip: In Chrome, go to Settings > Extensions to disable resource-heavy add-ons.
How to Use Activity Monitor to Control Processes
- Monitor Usage: Sort by “% CPU” or “Memory” to spot resource hogs.
- Inspect Details: Double-click a process for its parent app and stats.
- Quit Processes: Highlight a process and click the “X” button to stop it (system processes may restart).
- Filter Results: Use the search bar to find specific processes like coreaudiod or trustd.
- Check Impact: Switch to the Energy tab to see power-hungry apps.
Pro Tip: Use the “Sample Process” option (under the “View” menu) to debug unresponsive apps.
When to Intervene
Brief spikes in process activity are normal, but persistent high usage, fan noise, or app freezes warrant action. Processes like WindowServer or cloudd may settle after their tasks complete, while kernel_task might indicate hardware stress needing deeper investigation.
Activity Monitor is your command center for controlling apps and processes in macOS. By mastering its features, you can manage everything from WindowServer graphics rendering to cloudd iCloud syncing with confidence. Use this guide to keep your Mac responsive and efficient, and revisit it whenever performance dips.
Bookmark this page for more macOS optimization tips and tricks!